Build AngularJs on Windows
Clone Repository
First clone the git repository for AngularJs. If you don’t already have git or are unfamiliar with git you can download and install Git for Windows. This is likely the best option for you if you are relatively new to git. You’ll be able to click the “Clone in Windows” button on the right of the AngularJs repository.
Install Development Dependencies
If you don’t already have the NPM package manager installer on your machine you’ll need to install it. Probably the easiest way for you is to install NodeJs. This will install the package manager which is very handy, for much more than this task. Choose the option for your platform here.
Once you have NPM installed you can now finish setting up the dev utilities that you’ll need. AngularJs among many other frameworks and apps build via Grunt. You’ll also need Bower. To install both along with a few other dependencies just run the following from the directory you’ve cloned Angular to:
npm install
Once you have run npm install you’ll need to install the grunt-cli and bower but we’ll need this installed globally. To do so add the -g flag as such:
npm install grunt-cli -g

npm install bower -g
The Missing Environment Setup
There are a few other things that you might get stuck on when trying to build AngularJs via Windows. You’ll need the Java Runtime Environment package installed. This is used quite often and you may already have it installed. If not go here grab it and run the installer for your platform.
Once you have java installed you’ll need to add some Environment Variables to make the build happy. In order to do this click your start button for right click “Computer” from Explorer and choose properties. Next choose “Advanced System Settings” on the left of the window. The advanced tab will open and you’ll see the “Environment Variables” button on the bottom of the dialog window.
You should now be in the Environment Variables dialog on the top you’ll see user variables and the bottom system variables. We’ll need to modify both.
Add Java to Path
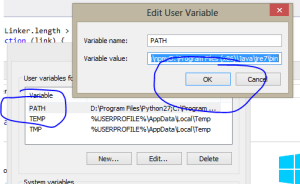
Double click on the line that says “PATH” or highlight and then select edit. Go to the end of the line and add a semi-colon. After the semi-colon add the path to your java runtime environment. Probably something like C:\Program Files (x86)\Java\jre7\bin if you are on a 64bit machine. Add that to the end of the line and then select OK.
Setup Java Virtual Machine
In the System Variables you’ll need to click “New” and add a new key value pair. For the variable name use _JAVA_OPTIONS and for the value use -Xmx512m. This will setup the basic options you’ll need for the virtual machine. Say OK and close out of the dialog boxes.
NOTE: Be sure to close out of any command prompt windows you might have had open. If you started to run the build process before completing the above it won’t work so after installing make sure you’ve closed out of your command windows and then re-launch.
Running the Build
To actually package up the library is a snap you need only run the grunt command which will call the pre-configured Gruntfile.js for you and package it all up into the “build” folder in your repository directory. The command is below:
grunt package
Now What
Get involved and contributed to this awesome project. How do you do that? You can find it all => here.
Smart Table for AngularJs Extended
What is Smart Table
Smart table is module and set of directives to assist in sorting and paging a table/grid of data. I liked it as it doesn’t try to do too much and is simplistic to extend. No offense to some of the other grids but many I found tried to do too much and that usually spells disaster. Why? Well, there’s always something you need that due to the design you have difficulty doing. Smart Table handles the basic functions and leaves it at that.
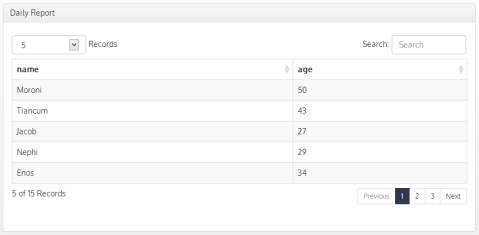
So here is an extended version that adds a couple nice features that make it have more of the Datatables Bootstrap feel. This is optimized for Bootstrap 3 but with little work you should be able to adapt it to your styling needs.
The zip contains the illustrator file used to create the sort icons, the compiled .css file, the Smart Table debug source and a less file for those that are importing Bootstrap and compiling .less. if you don’t know what LESS is don’t use that file.
You’ll also notice is the source file you’ll see /* START MODIFICATION */ anywhere the source has been modified. Hope it helps Email in source if you have ques.
Disclaimer: Just started playing with Smart Table literally today so if you can improve upon the code please do so and comment/email. Perhaps the author can take a look as this was a very quick fix for my needs.
Screenshot
Download
NPM MSBuild Errors Build Tool Cannot be Found
The builds tools for Visual Studio 2010 (Platform Toolset = ‘v100’) cannot be found.
If you work with NPM and NodeJs long enough and also develop using Visual Studio you’re bound to see the above complaint when loading npm packages.
There are couple things you can do. First if you are on Windows 7 download and install the Windows 7.1 SDK. You may need to uninstall any C++ redistributable runtimes if they are installed. The SDK install could fail. If it does that is likely why.
On Windows 8 running Visual Studio 2012 its a bit trickier. Often you’ll find node-gyp pointing to the wrong tool-set for building. One quick fix you can try is to re-install Visual Studio Update 3. This has successfully at least in my case resolved the issue.
Otherwise in a pinch install your npm package in the following manner and explicitly define the tool-set to use.
--msvs_version=2012
BOM Will Bomb Your Package
Another cool tool for removing UTF-8 BOM marks when developing on Windows for *NIX systems. Must have cool tool or use dos2unix and batch file you can find here.
DOWNLOAD: File BOM Detector
Clearing Node’s NPM Cache
Pretty simple really
 # rm -rf ~/.npm

# npm cache clear
Use this process when you need to make sure a package isn’t loading anything from npm’s cache. Say you’ve updated or did a force update of your package and you need to make sure it pulls everything down and updates changes.
Azure Node.js Visual Studio Publishing Error
Been doing a lot of Node.js of late as well as publishing to Azure. There are a couple kinks that I’ll share.
Issues Publishing Node Website to Azure From Visual Studio
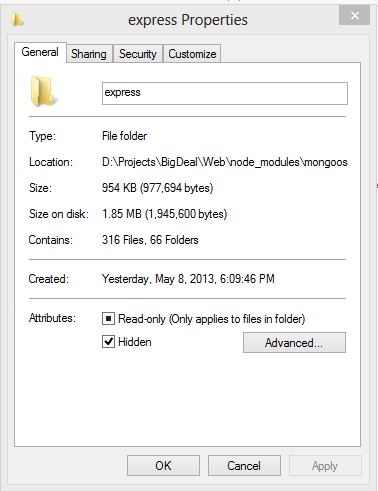
First and foremost by far the easiest way to publish to Azure is probably WebMatrix 3. It’s rather idiot proof. Unfortunately its not nearly as intuitive to develop in as Visual Studio is. At least I don’t like it. If you’re in VS a lot you’ll probably feel the same. However with that said WebMatrix does a few things for you automatically. It also seems to ignore a glarring issue you’ll find in VS and that is the length of file paths. This is due to the structure of nesting in the node_modules directory for all your modules. Mongoose for one has an example folder that you’ll need to hide or exclude. If you open the folder as a web site you won’t have the exclude like you normally would in a VS project, hence the easiest way I found was to mark this folder as hidden directly from Explorer. For me this is no big deal as I always have hidden folders shown. I’m always monkeying with “C:\sers\profile\AppData” folder for one reason or another among others so I always have hidden files/folders set as visible.
Mark Folder as Hidden
Simply open the parent directory and right click on the folder you want to hide, select hidden
Once this is completed Visual Studio will ignore this directory when publishing
Zepto.js Rakefile
This is a Rakefile to substitute the default in the Zepto.js mobile framework.
Note the extension on the download file is .doc. This is because WordPress limits the file types that can uploaded. Be sure to rename it with no extension.
Cloud9 & Latest Nodejs (ver. 6) Not Compatible.
In my travels I looked into Cloud9 for online development of projects such as those on Rails/Node. Unfortunately it doesn’t support the latest flavor of Nodejs. Problem is Cloud apparently partnered up with Joyent (co. that devs Nodejs and hired original creator of Nodejs) yet they aren’t supporting the new goods. The version they do support is a bit back. If I’m missing something let me know but it is a deal breaker for me. Cloud is cool but they need to get up to speed I’m afraid.
I only mention it in case someone else runs into this…
Nodejs Real World Example
Update/Warning
As of ver 3.x of Express for NodeJs DynamicHelpers are no longer use. Please use app.locals({ key: value }). See migration documentation.
Introduction
Fairly new to Nodejs, however I’ve been doing my share of Node applications of late. Thought I’d share a simple yet full fledged example application. What I mean is often you’ll have examples shown that really don’t tackle the little things that most sites need. Now that is not to suggest that this is a production project. It isn’t. In fact there are several security things I’d tweak a little, however the basics and concept are there for you to follow and expand on. In the example files you’ll be able to add/delete users and posts. You’ll be able to restrict access on resources like a link that only admins should see. You’ll be able to see comments added dynamically to html via jquery.post (ridiculously easy). There is the foundation for a tab based menu when code to show state(which tab is selected) and much more.
Assumptions
When you download the project there is one major assumption. That is that you have mongodb already running and installed. I’ll let you figure that part out for your specific platform but as long as it is running and on the default port you should be just fine with the downloaded code.
Download Sample
Code Samples
In this example I chose the MVC route, well sort of. I still kept the default “routes” folder as opposed to creating a “Controller” folder. However the principal is here. I strongly believe in MVC pattern. It is by far the best approach and I develop some pretty complex stuff. Its the right way to go. Enough preaching..
One of the things that I thought was a bit confusing when using “Express” which is the webserver engine that most use with Nodejs, was setting up cookie/sessions. I initially set it up in the “app.configure” session of my app.js (or server.js or whatever you called it). That didn’t fly at least for the default memory store approach that is built into express and its underlying connect. (connect is what express runs on). if you want to use MongoDB, SQLite or other as your store or sessions the below would need to be modified.
var app = module.exports = express.createServer(

express.cookieParser(),

express.session({secret: 'demo'})

);
Environment Options
One of the cool things about Nodejs is that you can start Nodejs with multiple configs via command line. I find this super handy. By entering a verb prior to the node exe (in the case of Windows) you can change your environment. for ex: you can do NODE_ENV=production node app.js where “production” is a name that exists in your app.js. For example in this demo. There is a “development” and “production” configuration along with the default. If you are on windows I built a quickie starup app where you can modify a config to start your project.You can download it on Github. Be sure to view the readme. If you just want the exe and don’t care about the entire project just browse the /bin/debug folder and grab the exe and the config.xml file. put both of those in the same directory (the top level of your project). Download StartNode for Windows. StartNode for windows is included also in the project you downloaded above however it assumes you are on a 64bit windows system with node installed in the default location.
Example configuration
// Configuration

app.configure(function () {

    app.set('views', __dirname + '/views');

    app.set('view engine', 'jade');

    app.use(express.bodyParser());

    app.use(express.methodOverride());

    app.use(express.static(__dirname + '/public'));

    app.use(express.logger());

    app.use(app.router);

});
app.configure('development', function () {
app.use(express.errorHandler({ dumpExceptions: true, showStack: true }));
});
app.configure('production', function () {
app.use(express.errorHandler());
});
Dynamic Helpers
These are really cool little guys. They allow you to expose things like session, flash (similar to Ruby) and many other things to your views. In our case here I exposed two other helpers beyond session and flash which are pretty common to display feedback messages and user session information. So I wanted a way to show which tab on our menu the user was on. So what we did is expose a helper to tell us what the current req.url is. Then with a little jquery help (see /public/javascripts/menu.js) we’re able to style our tabs accordingly with css. Also some links and resources shouldn’t be available to all users. For example a “Delete” link shouldn’t be avail to everyone. So our “authorized” attribute allows us to pass a list of roles that we can then check based on the user’s roles if they have access to the resource. There is one other piece that you’ll notice that makes this all happen which is our “global module”. It takes the roles (csv string) and the user roles also csv and creates and array for both and compares to see if the user contains an approved role. This is a must have on most sites but I was unable to find and example so I whipped it up. If there are modifications or suggestions but the more well versed in Nodejs please do comment.
var global = require(‘./public/javascripts/global.js’); // this is the require to our module.
app.dynamicHelpers({
session: function (req, res) {
return req.session;
},
flash: function (req, res) {
return req.flash();
},
scripts: function (req, res) {
return [‘/javascripts/jquery-1.7.2.min.js’, ‘/javascripts/jquery-ui.min.js’];
},
tab: function (req, res) {
return req.url;
},
authorized: function (req, res, next) { // checks to see if resource is available to user by roles passed.
return function (roles) {
var authorized = false;
if (req.session.user)
authorized = global.authenticate(roles, req.session.user.roles)
return authorized;
};
}
});
Here is the module that handles the authorization helper above, again see /public/javascripts/global.js
authorized: function (roles, uRoles) {
var _reqRoles = roles.replace(/\s+/g, ' ');
_reqRoles = roles.toLowerCase().split(',');
var _usrRoles = null;
if (uRoles != null) {
uRoles = uRoles.replace(/\s+/g, ' ');
_usrRoles = uRoles.toLowerCase().split(',');
}
// Check if there if this is a public resrouce.
if (_reqRoles.indexOf('*') > -1)
return true;
for (var i = 0, r; r = _reqRoles[i]; i++) {
if (_usrRoles != null && _usrRoles.indexOf(r) > -1)
return true;
};
return false;
}
By the way you might notice above a helper to load script libraries. We’ll get to that in the following section.
Handling Scripts
Our Dynamic Helper above gives us a list of libraries to expose to our view. So how do we use that. Pretty simple really. We tell it to iterate over the array and add those scripts to our header. here is an example of how to do that using “jade syntax” which is probably the most common view library. If it seems confusing to you just copy the syntax and Google “jade to html converter”. It will present itself and make sense.
so below we are getting the script source by iterating and then adding the script.
	// get scripts from DynamicHelper in app.js

		- each s in scripts

			script(type='text/javascript', src= s)

		// Use block so child pages can append to header.

		block append head
You’ll notice that there is an interesting element there called “block append head”. this is really cool as it allows us to add scripts to this section in our child views of this layout by simple creating a section “block head” and then indenting and adding our script. It will magically get put in our header. By the way you can also use block for your entire site. This could be a good approach if you were trying to mimic Drupal, Umbraco, Joomla etc. Essentially creating modular sections.
Wrap Up
I really like how simplistic Nodejs is. I must admit though that it needs to mature in some areas. However I’m not sure I’d go anywhere else if my family member said hey can you make me a simple site for this or that. It’s really painless. The biggest obstacle for Node is that more hosting accounts need to support it. Currently there are some hurdles in that area if you don’t own your own server, static IP and so on. If you do this is a winner. This just scratches the surface, there is so much more Nodejs can do. I would encourage you to try it out.


