
Build AngularJs on Windows
Clone Repository
First clone the git repository for AngularJs. If you don’t already have git or are unfamiliar with git you can download and install Git for Windows. This is likely the best option for you if you are relatively new to git. You’ll be able to click the “Clone in Windows” button on the right of the AngularJs repository.
Install Development Dependencies
If you don’t already have the NPM package manager installer on your machine you’ll need to install it. Probably the easiest way for you is to install NodeJs. This will install the package manager which is very handy, for much more than this task. Choose the option for your platform here.
Once you have NPM installed you can now finish setting up the dev utilities that you’ll need. AngularJs among many other frameworks and apps build via Grunt. You’ll also need Bower. To install both along with a few other dependencies just run the following from the directory you’ve cloned Angular to:
npm install
Once you have run npm install you’ll need to install the grunt-cli and bower but we’ll need this installed globally. To do so add the -g flag as such:
npm install grunt-cli -g

npm install bower -g
The Missing Environment Setup
There are a few other things that you might get stuck on when trying to build AngularJs via Windows. You’ll need the Java Runtime Environment package installed. This is used quite often and you may already have it installed. If not go here grab it and run the installer for your platform.
Once you have java installed you’ll need to add some Environment Variables to make the build happy. In order to do this click your start button for right click “Computer” from Explorer and choose properties. Next choose “Advanced System Settings” on the left of the window. The advanced tab will open and you’ll see the “Environment Variables” button on the bottom of the dialog window.
You should now be in the Environment Variables dialog on the top you’ll see user variables and the bottom system variables. We’ll need to modify both.
Add Java to Path
Double click on the line that says “PATH” or highlight and then select edit. Go to the end of the line and add a semi-colon. After the semi-colon add the path to your java runtime environment. Probably something like C:\Program Files (x86)\Java\jre7\bin if you are on a 64bit machine. Add that to the end of the line and then select OK.

Setup Java Virtual Machine
In the System Variables you’ll need to click “New” and add a new key value pair. For the variable name use _JAVA_OPTIONS and for the value use -Xmx512m. This will setup the basic options you’ll need for the virtual machine. Say OK and close out of the dialog boxes.

NOTE: Be sure to close out of any command prompt windows you might have had open. If you started to run the build process before completing the above it won’t work so after installing make sure you’ve closed out of your command windows and then re-launch.
Running the Build
To actually package up the library is a snap you need only run the grunt command which will call the pre-configured Gruntfile.js for you and package it all up into the “build” folder in your repository directory. The command is below:
grunt package
Now What
Get involved and contributed to this awesome project. How do you do that? You can find it all => here.
Smart Table for AngularJs Extended
What is Smart Table
Smart table is module and set of directives to assist in sorting and paging a table/grid of data. I liked it as it doesn’t try to do too much and is simplistic to extend. No offense to some of the other grids but many I found tried to do too much and that usually spells disaster. Why? Well, there’s always something you need that due to the design you have difficulty doing. Smart Table handles the basic functions and leaves it at that.
So here is an extended version that adds a couple nice features that make it have more of the Datatables Bootstrap feel. This is optimized for Bootstrap 3 but with little work you should be able to adapt it to your styling needs.
The zip contains the illustrator file used to create the sort icons, the compiled .css file, the Smart Table debug source and a less file for those that are importing Bootstrap and compiling .less. if you don’t know what LESS is don’t use that file.
You’ll also notice is the source file you’ll see /* START MODIFICATION */ anywhere the source has been modified. Hope it helps Email in source if you have ques.
Disclaimer: Just started playing with Smart Table literally today so if you can improve upon the code please do so and comment/email. Perhaps the author can take a look as this was a very quick fix for my needs.
Screenshot
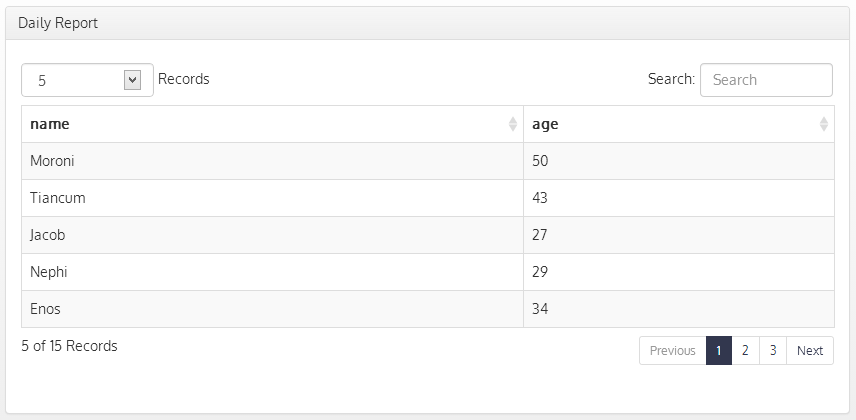
Smart Table
Download
NPM MSBuild Errors Build Tool Cannot be Found
The builds tools for Visual Studio 2010 (Platform Toolset = ‘v100’) cannot be found.
If you work with NPM and NodeJs long enough and also develop using Visual Studio you’re bound to see the above complaint when loading npm packages.
There are couple things you can do. First if you are on Windows 7 download and install the Windows 7.1 SDK. You may need to uninstall any C++ redistributable runtimes if they are installed. The SDK install could fail. If it does that is likely why.
On Windows 8 running Visual Studio 2012 its a bit trickier. Often you’ll find node-gyp pointing to the wrong tool-set for building. One quick fix you can try is to re-install Visual Studio Update 3. This has successfully at least in my case resolved the issue.
Otherwise in a pinch install your npm package in the following manner and explicitly define the tool-set to use.
--msvs_version=2012
ClearOS vs. Zentyal
Going to keep this short and sweet. In the past I’ve always run vanilla *NiX boxes. Why? well I’ve been at this a while since I was a kid in the 80’s so there’s that. Command lines are natural to my gen. But in recent years unlike many of the “do everything command line” fanboi’s the reality is that sometimes its nice to have some sort of management UI. If you are argue that you’re doing just that, being argumentative.
So recently I checkout the two SBS flavors for Linux. That being ClearOS and Zentyal. The former runs on CentOS where Zentyal runs on Ubuntu. First I’m a fan of Ubuntu they are doing some nice work and their desktop is one of my favs. With that said I’m not as confident with Ubuntu’s server. Be clear that doesn’t mean its not solid. In fact if you roll the LTS version you should be good for updates/fixes for sometime. What I will say is that although CentOS can be a pain package-wise it is very stable. There’s a reason many third parties bundle with CentOS. It may be slow to the latest and greatest but isn’t as likely to break either.
With Zentyal I have to be honest I like the GUI its pretty cool. The scaled back GUI for the desktop that it boots to automatically is handy. Just remember GUI’s take resources so if you have limited ponies don’t run it, just use the Web UI. I did find the Zentyal GUI on the desktop to be a little clunky at times. It’s cool but…I probably wouldn’t run it. This was tested on an older chip. Quad Core with 16GB of ram. Not a slow box but not Xeon or i7 either.
ClearOS’s GUI is laid out very nice. Its clean and concise. It doesn’t have the fancy fell that Zentyal does but in my opinion that’s not a negative. Might even be a plus actually. Also had better hardware detection with ClearOS, but that’s more about Cent really.
WINNER: Both
In short there are a couple things to consider. If you want bells and whistles go with Zentyal and Ubuntu. If you want solid stable battle tested go with ClearOS and Cent. I want to be clear Ubuntu is very stable, but CentOS is a true enterprise build with slow strategic and tested updates.
What would I choose
I’d go ClearOS and in fact did for a box just to have it around. I still like to run my own vanilla boxes just so I know there’s not some issue updating a package or something that the GUI management software doesn’t like.
BOM Will Bomb Your Package
Another cool tool for removing UTF-8 BOM marks when developing on Windows for *NIX systems. Must have cool tool or use dos2unix and batch file you can find here.
DOWNLOAD: File BOM Detector
Clearing Node’s NPM Cache
Pretty simple really
 # rm -rf ~/.npm

# npm cache clear
Use this process when you need to make sure a package isn’t loading anything from npm’s cache. Say you’ve updated or did a force update of your package and you need to make sure it pulls everything down and updates changes.
Convert Windows Line Endings to Unix
From time to time I create projects that need to be supported by both Windows and *NIX systems. Line endings are always a pain and although GIT has helped this a lot there are still issues at times that you must deal with manually.
Here is a quick way to output a project and convert line endings all in one. This is not difficult but probably won’t make much sense unless you’ve messed with .cmd or .bat files in the past.
First grab dos2unix here. You’ll need to select the correct binary for your platform either 32bit or 64bit. As of today 6.0.3 is the current version.
Save the below to “your_project_name.bat”
@ECHO off

setlocal EnableDelayedExpansion
SET source=D:\Path\To\Your\Source
SET dest=D:\Path\To\Your\Destination
SET d2upath=D:\dos2unix\Folder\Path
CALL publish.bat -r -s %source% -d %dest%
cd %dest%
ECHO Converting files to unix line endings…
SET exts=*.json, *.js
FOR %%f in (%exts%) DO (
CALL %d2upath%\dos2unix %%f
)
ECHO Finished publishing.
Save the following to “publish.bat”
@ECHO off

setlocal EnableDelayedExpansion
REM Set npm path, default build directory various variables.
SET execDir=%~dp0
SET sourceDir=%CD%
SET destDir=
SET lastArg=0
SET sourceIdx=0
SET destIdx=0
SET ctr=0
SET empty=n
REM No args passed use defaults goto dependency check.
IF [%~1]==[] GOTO :HELP
IF /i %~1==-h GOTO :HELP
REM Loop over args and assign them.
:SETARGS
IF [%~1]==[] GOTO :DIREXISTS
IF /i %~1==-s (
SET /a sourceIdx=%ctr%+1
)
IF /i %~1==-d (
SET /a destIdx=%ctr%+1
)
IF /i %~1==-r (
SET empty=y
)
IF %ctr%==%sourceIdx% (
IF %lastArg%==-s SET sourceDir=%~1
)
IF %ctr%==%destIdx% (
IF %lastArg%==-d SET destDir=%~1
)
SET lastArg=%~1
SET /a ctr+=1
SHIFT & GOTO :SETARGS
:DIREXISTS
IF EXIST %destDir% GOTO :PUBLISH
SET /p create=”Directory “%destDir%” does not exist, would you like to create it (y or n)?”
IF %create%==y (
ECHO Creating directory…
MKDIR %destDir%
GOTO :PUBLISH
)
ECHO ——————————————————-
ECHO Nothing to do, no output directory exiting…
GOTO :END
:PUBLISH
ECHO PUBLISHING: %sourceDir% to %destDir%
ECHO ——————————————————-
IF %empty%==y (
ECHO Removing files and subfolders.
RD %destDir% /s /q
ECHO:
)
MKDIR %destDir%
ECHO Publishing please wait…
ECHO:
IF EXIST pubignore.txt (
XCOPY /s /y /EXCLUDE:pubignore.txt %sourceDir%\* %destDir%
) ELSE (
XCOPY /s /y %sourceDir%\* %destDir%
)
GOTO :END
:HELP
ECHO:
ECHO HELP: Publish Script Help.
ECHO ——————————————————-
ECHO -s (specify source, default is current directory.)
ECHO -d (specify destination directory [required].)
ECHO -r (remove directory and re-create)
GOTO :END
:END
ECHO:
ECHO FINISHED
Create a text file with the name “pubignore.txt”
In this file you can put in files you want it to ignore when it copies the files from your source to your destination that you created in “your_project_name.bat”. This uses the standard xcopy EXCLUDE formatting.
NOTE: in the “your_project_name.bat” you can specify file extension types that you want dos2unix to convert also do this where it says “SET exts=*.json, *.js”
Created the files now what?
So once you’ve created all three files you have a couple options. You can put them all in the same folder as your project and then cd D:\Your\Project\Path. Where again “D” is the drive your project is in, then simply run “your_project_name.bat”.
The other option is to create a “Scripts” folder somewhere on your machine and then dump all but pubignore.txt (it needs to go in the project folder itself) in that folder. Lastly in your environment variables for your path include the path to the scripts folder. You can do this using the link I provided above or through the command line. Just Google it if you don’t quite get it. Once you do that you can just run “your_project_name.bat” from anywhere and it will do its job. This is in fact what I do and often call it from Visual Studio on build.
DOWNLOAD dos2unix
Xipframe MVC Framework
Want to check out a cool NodeJs based framework? Checkout Xipframe! Not only does it build out many of the mundane tasks of building a web application for you but it also can enable LESS and AngularJS helpers for you as well. Tired of managing CSS and JavaScript file references? Xipframe does that for you too.
Check it out here.
Download it via NPM here.
Adblock Custom Filters NFL Sites Nag
Block Ads and Notifications of Ad Blockers
Ever get tired of NFL sites and others notifying you that their site is “best viewed with ad blockers turned off”. This is because they make money on these hits hence they don’t want you blocking them. However to the user they are rather annoying. As a developer I understand fully why they don’t want them blocked. However the reason users block ads is because developers/companies over do it causing frustration for the user. If not over done there’d be little need for ad blockers.
How to Fix it
First install the adblocker extension for chrome. If you are not using Chrome stop go install it, slap yourself with a fresh trout apologize to your computer and then continue. Folks trust me Chrome is miles better than any other offering. It just is.
After you have it installed you’ll want to click on the stop sign icon in the upper right of your browser it has a hand inside it then select options.

Go to the “customize” tab and then click the edit button. See image below.

Finally add the same filters you see in the image above. This will block the nag claiming the site is best viewed without ad blockers. Note you can do this with any page following the same syntax. So for example you could right click while in Chrome and and choose “inspect element” this will tell you what the offending HTML element is. You then enter a similar syntax and unless the developer of the page changes that class name or id etc. you’ll never see it again.
Filter List
For your convenience I’ll update this list periodically as I come across other offenders.
Download: adbock_filter_list
Conclusion
Again I get the need for ads. They pay for the sites we use. However if a user blocks ads with a blocker their preferences should be respected. You NEVER as a developer circumvent the user’s preferences. Some may disagree but for me I think its important.
